
Article Text
The Battle of Midway, fought over four intense days from June 4th to June 7th, 1942, near the tiny U.S. mid-Pacific atoll of Midway, stands as one of the most strategically decisive naval battles in world history. Less than six months after the devastating Japanese attack on Pearl Harbor, the United States Navy, outnumbered and seemingly outmatched, inflicted a catastrophic defeat upon the Imperial Japanese Navy (IJN), sinking four of its best aircraft carriers. This stunning victory irreversibly shifted the balance of power in the Pacific, halting Japan's seemingly unstoppable eastward expansion and marking the point from which the Allies began their long, arduous path to victory in World War II.
Prelude to Conflict: The Pacific Ablaze
Following Pearl Harbor on December 7, 1941, Japan embarked on a whirlwind offensive across Southeast Asia and the Pacific. Hong Kong, Malaya, Singapore, the Dutch East Indies, the Philippines, Wake Island, and Guam all fell to Japanese forces with stunning rapidity. The IJN, particularly its carrier strike force, the Kido Butai, appeared invincible, having sunk or crippled numerous Allied warships, including the British battleships HMS Prince of Wales and HMS Repulse.
By spring 1942, Admiral Isoroku Yamamoto, Commander-in-Chief of Japan's Combined Fleet and the architect of Pearl Harbor, sought to achieve two primary strategic objectives:
Destroy the remaining U.S. Pacific Fleet aircraft carriers: These carriers had escaped Pearl Harbor and had already proven troublesome, most notably by launching the Doolittle Raid on Tokyo in April 1942. This raid, while causing minimal physical damage, was a profound psychological blow to Japan and a morale booster for the U.S.
Extend Japan's defensive perimeter: Capturing Midway Atoll would provide an advance airbase, disrupt American supply lines, and serve as a stepping stone for potential future operations against Hawaii.
Yamamoto's plan for Operation MI (the Midway operation) was exceedingly complex, involving multiple fleets converging from different directions. It relied on surprise, precise timing, and the assumption that the U.S. Navy would react predictably. The main components included:
First Carrier Striking Force (Kido Butai): Commanded by Vice Admiral Chuichi Nagumo, with four fleet carriers (Akagi, Kaga, Soryu, Hiryu), forming the spearhead.
Main Body: Commanded by Yamamoto himself, with battleships (including his flagship Yamato), intended to engage and destroy any U.S. fleet remnants.
Midway Invasion Force: Commanded by Vice Admiral Nobutake Kondo, responsible for landing troops on Midway.
Aleutian Diversionary Force: A smaller force to attack the Aleutian Islands (Attu and Kiska) to draw U.S. attention northward.
Yamamoto's plan, however, suffered from several critical flaws: overconfidence, excessive dispersal of forces (making mutual support difficult), and a rigid adherence to a complex timetable. Crucially, it underestimated American resolve and, most importantly, American intelligence capabilities.
The Codebreakers' Triumph: U.S. Intelligence
The U.S. Navy's Combat Intelligence Unit at Pearl Harbor (Station HYPO), led by the brilliant but eccentric Commander Joseph Rochefort, had been making significant progress in breaking Japanese naval codes, particularly JN-25b. By May 1942, Rochefort's team could decipher roughly 10-15% of messages but could often glean critical information about locations, timings, and force compositions.
Suspecting a major Japanese operation targeting a location designated "AF," U.S. intelligence needed confirmation that "AF" was indeed Midway. They devised a clever ruse: Midway was instructed to send an unencrypted radio message falsely reporting a freshwater condenser breakdown. Shortly thereafter, HYPO intercepted a Japanese message stating that "AF" was short of fresh water. The trap was sprung; "AF" was confirmed as Midway.
Armed with this vital intelligence, Admiral Chester W. Nimitz, Commander-in-Chief of the U.S. Pacific Fleet (CINCPAC), despite being significantly outnumbered, prepared to ambush the Japanese. He scraped together every available asset.
Opposing Forces: A David vs. Goliath Scenario?
Imperial Japanese Navy (IJN):
Carriers: 4 fleet carriers (Akagi, Kaga, Soryu, Hiryu), plus light carriers in support groups.
Aircraft: Approximately 248 operational aircraft embarked on the four main carriers, including the superb Mitsubishi A6M "Zero" fighter, Aichi D3A "Val" dive bomber, and Nakajima B5N "Kate" torpedo bomber.
Pilots: Highly experienced and battle-hardened veteran aircrews.
Weaknesses: Overly complex plan, poor reconnaissance doctrine (relying on too few, slow floatplanes), inadequate damage control, and a lack of radar on many ships. Japanese carrier doctrine emphasized devastating initial strikes but was less flexible in adapting to unexpected developments.
United States Navy (USN):
Carriers: 3 fleet carriers: USS Enterprise (CV-6) and USS Hornet (CV-8) of Task Force 16 (commanded by Rear Admiral Raymond A. Spruance, who had replaced the ailing Vice Admiral William "Bull" Halsey), and USS Yorktown (CV-5) of Task Force 17 (commanded by Rear Admiral Frank Jack Fletcher, the senior tactical commander). Yorktown had been heavily damaged at the Battle of the Coral Sea in May but was miraculously repaired in just 48-72 hours at Pearl Harbor – a testament to American industrial ingenuity and determination.
Aircraft: Approximately 233 carrier aircraft, plus over 120 land-based aircraft on Midway Atoll (a mix of fighters like the Grumman F4F Wildcat and Brewster F2A Buffalo, and bombers like the Douglas SBD Dauntless, Vought SB2U Vindicator, and Martin B-26 Marauder, Boeing B-17 Flying Fortress). U.S. aircraft were generally considered inferior to their Japanese counterparts, particularly the F4F Wildcat versus the Zero, and the Douglas TBD Devastator torpedo bomber was tragically obsolete.
Pilots: Less experienced overall than the Japanese, though many were well-trained and courageous.
Strengths: Superior intelligence (codebreaking), effective use of radar (giving early warning), better damage control techniques, and a simpler, more focused operational plan.
Nimitz positioned his carriers northeast of Midway, in a perfect position to ambush Nagumo's Kido Butai as it approached from the northwest to attack the atoll.
The Battle Unfolds: June 3rd – Initial Contacts
On June 3rd, U.S. PBY Catalina flying boats spotted elements of the Japanese invasion force, initiating the first, albeit minor, engagements. A flight of B-17s from Midway attacked these ships with little effect. The main Japanese carrier force remained undetected.
June 4th: The Decisive Day – "The Five Glorious Minutes"
04:30: Nagumo launched his first strike wave of 108 aircraft against Midway Atoll, unaware of the U.S. carriers lurking nearby. His reconnaissance efforts were belated and insufficient.
05:34: A PBY Catalina from Midway, piloted by Lieutenant Howard Ady, famously radioed: "Enemy carriers sighted!" This was followed by "Many planes heading Midway."
06:16 - 06:40: The Japanese strike hit Midway. Despite fierce anti-aircraft fire and attacks by Midway-based U.S. Marine Corps fighters (many of which were shot down), the Japanese inflicted considerable damage on the island's facilities. However, the airfields remained operational. The Japanese strike leader, Lieutenant Joichi Tomonaga, radioed Nagumo that a second strike on Midway was needed.
The American Strikes from Midway: Throughout the morning, Midway-based aircraft launched piecemeal attacks against Nagumo's carriers. These included Marine SBD Dauntlesses and SB2U Vindicators, Navy TBF Avenger torpedo bombers (making their combat debut, six Avengers from Torpedo Squadron 8's Midway detachment attacked, five were shot down), and Army Air Forces B-26 Marauders (rigged with torpedoes) and B-17s. These attacks, though pressed with great courage, were largely uncoordinated and ineffective, suffering heavy losses. However, they critically disrupted Japanese operations, forced Nagumo's carriers to maneuver defensively, and delayed the preparation of his reserve aircraft.
Nagumo's Fatal Dilemma (07:00 - 08:30): Nagumo faced a critical decision. His first wave was returning from Midway, needing to land, re-arm, and refuel. His reserve aircraft were armed with torpedoes, anticipating an engagement with U.S. naval forces (as per doctrine, should they appear). However, Tomonaga's message indicated Midway needed another strike, which would require re-arming the reserve aircraft with land bombs.
At 07:15, Nagumo ordered the torpedo-armed Kates to be re-armed with general-purpose bombs for a second strike on Midway. This was a time-consuming process.
Around 07:28, a Japanese scout plane finally reported sighting American ships, but critically, did not initially identify them as carriers.
At 08:20, the scout plane belatedly reported: "Enemy force accompanied by what appears to be aircraft carrier."
This news threw Nagumo's plans into chaos. He now had planes returning from Midway, planes on deck being re-armed from torpedoes to bombs (and some now needing to be re-armed back to torpedoes), and American carriers to deal with. He vacillated, first confirming the order to re-arm with torpedoes, then deciding to recover his Midway strike force first before launching against the U.S. carriers. This decision meant his flight decks were crowded with aircraft, fuel lines, and ordnance – a highly vulnerable state.
The Sacrifice of the Torpedo Bombers (09:20 - 10:20): U.S. carrier aircraft began their attacks. The first to arrive were the slow, vulnerable TBD Devastator torpedo squadrons, launched without fighter escort or with inadequate coordination.
Torpedo Squadron 8 (VT-8) from USS Hornet: Led by Lieutenant Commander John C. Waldron. All 15 aircraft were shot down by Zeros and anti-aircraft fire; only one pilot, Ensign George Gay, survived.
Torpedo Squadron 6 (VT-6) from USS Enterprise: Led by Lieutenant Commander Eugene E. Lindsey. 10 of 14 aircraft were shot down.
Torpedo Squadron 3 (VT-3) from USS Yorktown: Led by Lieutenant Commander Lance E. Massey. 10 of 12 aircraft were shot down.
The sacrifice of these 35 out of 41 torpedo bombers and their crews was horrific. They failed to score a single torpedo hit. However, their determined, low-level attacks drew the Japanese Combat Air Patrol (CAP) of Zero fighters down to wave-top height, leaving the skies above Nagumo's carriers dangerously exposed. Their heroism also disrupted Japanese launch preparations.
"The Five Glorious Minutes" (approx. 10:20 - 10:25): As the last torpedo attacks were being annihilated, U.S. SBD Dauntless dive bombers, arriving from different directions and at high altitude, almost simultaneously found the Japanese carriers.
Lieutenant Commander C. Wade McClusky, leading dive bombers from Enterprise (VB-6 and VS-6), had been searching fruitlessly. Following a lone Japanese destroyer (the Arashi, which had been chasing off the U.S. submarine Nautilus), he providentially led his squadrons directly to the Kido Butai.
Dive bombers from Yorktown (VB-3), led by Lieutenant Commander Maxwell F. Leslie, also arrived.
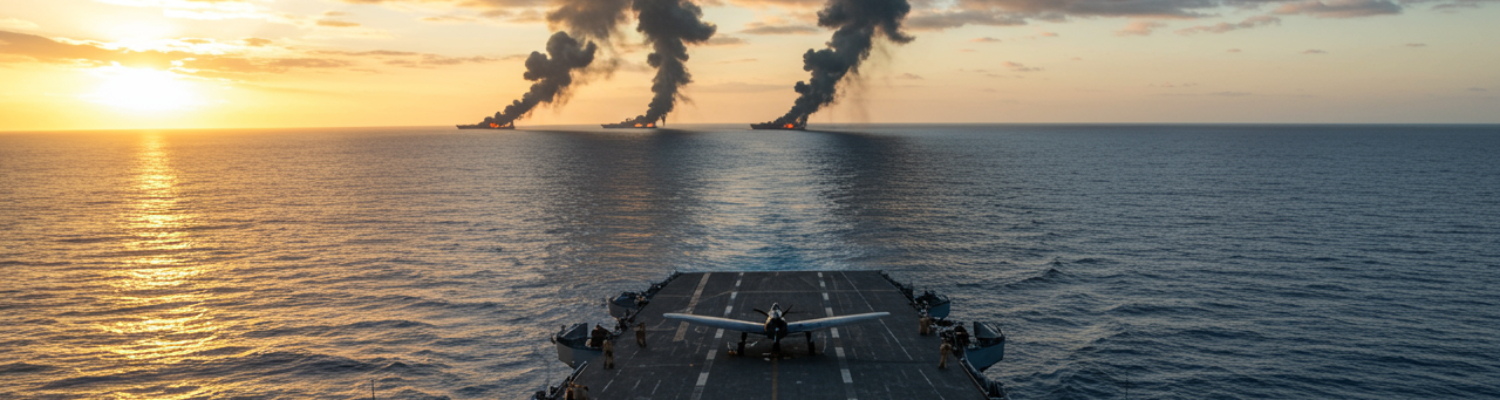
In a devastatingly coordinated (though largely accidental) series of attacks lasting only about five minutes, the Dauntlesses rained bombs on the vulnerable Japanese carriers:IJNS Kaga was hit by at least four bombs, igniting fuel and ordnance, turning her into an inferno. She sank that evening.
IJNS Akagi (Nagumo's flagship) took at least two direct hits. One bomb penetrated to the hangar deck, exploding among fueled and armed aircraft. Uncontrollable fires doomed her. She was scuttled the next morning.
IJNS Soryu was struck by three bombs, also igniting massive fires. She sank within hours.
Within minutes, three of Japan's finest aircraft carriers were burning wrecks. The tide of battle had turned with breathtaking speed.
The Fight of the Hiryu (10:40 - 17:03): Only one Japanese carrier, IJNS Hiryu, commanded by Rear Admiral Tamon Yamaguchi (one of the IJN's most aggressive carrier commanders), remained operational. Yamaguchi swiftly launched two counter-strikes.
First Strike (approx. 10:40 launch): Val dive bombers, escorted by Zeros, attacked USS Yorktown around noon, hitting her with three bombs. Yorktown was severely damaged, lost power, and came to a halt, but her superb damage control teams heroically got her underway again.
Second Strike (approx. 13:30 launch): Kate torpedo bombers from Hiryu found the partially repaired Yorktown around 14:30 and hit her with two torpedoes. This time, the damage was fatal. Captain Elliott Buckmaster ordered "Abandon Ship."
The End of the Hiryu (17:00): U.S. scout planes located Hiryu. Enterprise and Hornet launched a strike force (primarily Dauntlesses from Enterprise, including some homeless Yorktown SBDs). Around 17:03, they attacked Hiryu, hitting her with at least four bombs. Like her sisters, she was engulfed in flames. Admiral Yamaguchi and Hiryu's captain, Tomeo Kaku, chose to go down with their ship. Hiryu was scuttled early on June 5th.
June 5th-7th: Aftermath and Pursuit
With all four of his front-line carriers lost, Yamamoto, stunned by the catastrophe, ordered a general withdrawal. Spruance, cautious of a night engagement with Japan's powerful surface fleet and needing to protect his own carriers, initially pursued conservatively.
On June 6th, U.S. aircraft located and attacked the Japanese heavy cruisers Mogami and Mikuma, which had collided while maneuvering to avoid a U.S. submarine. Mikuma was sunk, and Mogami was heavily damaged.
USS Yorktown, still stubbornly afloat, was taken under tow. However, on June 6th, the Japanese submarine I-168 slipped through the destroyer screen and torpedoed Yorktown and the destroyer USS Hammann (which sank quickly). Yorktown finally capsized and sank on the morning of June 7th.
Why Midway Was the Turning Point
The Battle of Midway was a catastrophic defeat for Japan and a transformative victory for the United States:
Material Losses for Japan:
Four Fleet Carriers: Akagi, Kaga, Soryu, and Hiryu – the core of the Kido Butai. Japan's carrier construction capacity could not quickly replace these losses.
One Heavy Cruiser: Mikuma sunk, Mogami heavily damaged.
Aircraft: Approximately 248 carrier aircraft destroyed, plus some floatplanes.
Personnel: Over 3,000 Japanese sailors and airmen killed, including a huge proportion of their most experienced and irreplaceable veteran naval aviators. The loss of this skilled cadre was arguably more damaging than the loss of the carriers themselves, as training new pilots to their level of expertise would take years.
Material Losses for the U.S.:
One Fleet Carrier: USS Yorktown.
One Destroyer: USS Hammann.
Aircraft: Approximately 150 aircraft (carrier and land-based).
Personnel: 307 American servicemen killed.
Strategic Impact:
Halt to Japanese Expansion: Midway effectively ended Japan's ability to project offensive naval power across the Pacific. Plans for further expansion (e.g., against Fiji, Samoa, New Caledonia) were permanently shelved.
Shift in Initiative: The U.S. seized the strategic initiative. Just two months later, U.S. Marines landed on Guadalcanal, beginning the long and bloody island-hopping campaign that would eventually lead to Japan.
Naval Air Power Balance: The battle evened the score in terms of fleet carrier strength in the Pacific (though Japan still held an edge in total carrier numbers if light carriers were included). More importantly, American industrial capacity was just beginning to ramp up, promising a wave of new Essex-class fleet carriers and Independence-class light carriers that Japan could not hope to match.
Key Factors in U.S. Victory:
Intelligence: The breaking of JN-25b was paramount, allowing Nimitz to set an ambush.
Leadership: Nimitz's calculated risk-taking, Fletcher's tactical command, and Spruance's cool-headed decisions (especially his crucial call to launch everything when the Japanese carriers were first spotted and his later caution) were vital.
Heroism and Sacrifice: The doomed attacks of the U.S. torpedo bomber squadrons, though failing to score hits, drew off Japanese fighter cover and disrupted their operations, paving the way for the dive bombers.
Luck and Timing: The almost simultaneous arrival of dive bombers from Enterprise and Yorktown over the Japanese carriers at their moment of maximum vulnerability was a stroke of incredible fortune, often referred to as "the hand of God" or "McClusky's Luck."
Japanese Flaws: Overconfidence, an overly complex and inflexible plan, poor reconnaissance, flawed carrier doctrine (especially regarding defensive fighter deployment and rapid re-arming), and Nagumo's indecisiveness at critical junctures all contributed to their defeat.
Conclusion: A Legacy of Courage and Consequence
The Battle of Midway was more than just a naval victory; it was a profound testament to American intelligence, industrial capability, courage, and the critical role of naval aviation. While the war in the Pacific would rage for three more bloody years, Midway marked the point where the seemingly unstoppable tide of Japanese conquest was broken. The sacrifice of those who fought and died there, on both sides, forged a new reality in the Pacific, setting the stage for eventual Allied victory. It remains a stark lesson in the interplay of strategy, technology, intelligence, leadership, and sheer chance in the crucible of war. The "incredible victory," as historian Walter Lord termed it, ensured that Midway Atoll, a tiny speck in the vast Pacific, would forever be synonymous with one of history's most decisive turning points.
Files
There are no files available.