
September 1944. The mood among the Allied High Command was one of intoxicating optimism. The beaches of Normandy were a distant memory; Paris had been liberated; and the German Wehrmacht, battered and bleeding, was retreating headlong toward the Fatherland. To the average soldier and the highest general alike, the prevailing sentiment was that the Third Reich was collapsing. The war, they whispered, would be over by Christmas.
It was in this climate of hurried confidence that Field Marshal Bernard Law Montgomery conceived one of the most audacious, complex, and ultimately tragic operations of the Second World War: Operation Market Garden.
It was a plan designed to end the war in a single stroke. It involved the largest airborne invasion in history, coordinated with a lightning-fast armored thrust up a narrow Dutch highway. The objective? To flank the Siegfried Line, cross the Rhine River, and strike directly at the industrial heart of Germany, the Ruhr.
However, history remembers Market Garden not as the stroke of genius that ended the war, but as a desperate failure—a logistical nightmare and a tactical catastrophe that resulted in the decimation of the British 1st Airborne Division. It is the story of courage, intelligence failures, radio blackouts, and the agonizing realization that the final objective was, indeed, a bridge too far.
Part I: The Strategic Dilemma
To understand why Market Garden happened, one must understand the logistics of late 1944. Following the breakout from Normandy, the Allied advance had been faster than anyone predicted. However, this speed created a crisis: supply lines were stretched to the breaking point. The "Red Ball Express"—the truck convoys ferrying fuel and ammunition from the Normandy beaches—could not keep up with the voracious appetite of the advancing armies.
General Dwight D. Eisenhower, the Supreme Allied Commander, favored a "Broad Front" strategy: advancing slowly and steadily across the entire line to grind the Germans down. However, his subordinates, specifically the American General George S. Patton and the British Field Marshal Montgomery, both argued for a "Narrow Front" strategy. They wanted Eisenhower to give them the bulk of the supplies to punch a single, decisive hole in the German lines.
Montgomery, usually known for his caution and meticulous preparation, stepped out of character. He proposed a plan so daring it bordered on the reckless. He argued that by laying a carpet of airborne troops across the Netherlands to seize key bridges, he could pave the road for his tanks to drive straight into Germany, bypassing the formidable defenses of the Siegfried Line.
Eisenhower, under immense pressure to finish the war before winter and the V-2 rockets devastated London, acquiesced. Montgomery got the green light. Operation Market Garden was born.
Part II: The Plan
The operation was divided into two distinct components: Market (the airborne assault) and Garden (the ground assault).
Market: The Airborne Army
The "Market" component was commanded by Lieutenant General Lewis H. Brereton and the First Allied Airborne Army. It called for the deployment of three and a half divisions—over 35,000 paratroopers and glider-borne infantry.
The US 101st Airborne Division (The Screaming Eagles): Dropped near Eindhoven to secure the bridges over the Wilhelmina Canal and the Dommel River.
The US 82nd Airborne Division (The All Americans): Dropped near Nijmegen to capture the bridges over the Maas and Waal rivers, specifically the massive road bridge at Nijmegen.
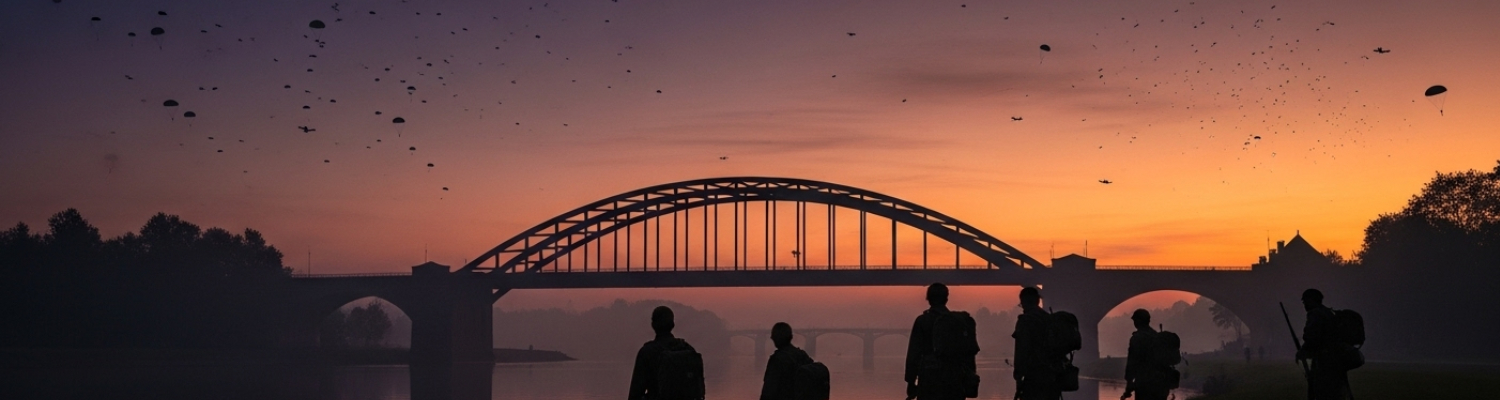
The British 1st Airborne Division (The Red Devils) & The Polish 1st Independent Parachute Brigade: Dropped farthest north at Arnhem to capture the ultimate prize: the road bridge over the Lower Rhine.
Garden: The Armored Thrust
The "Garden" component fell to the British XXX Corps (30 Corps), commanded by Lieutenant General Brian Horrocks. Their job was to drive north from the Belgian border along a single highway—Highway 69 (later dubbed "Hell’s Highway"). They had to link up with each airborne division in succession: first the 101st at Eindhoven, then the 82nd at Nijmegen, and finally relive the British paratroopers at Arnhem.
The timeline was incredibly tight. XXX Corps was expected to reach Arnhem—64 miles away—within two to three days. Any delay in capturing the bridges, or any blockage of the single road, would doom the paratroopers waiting at the end of the line.
Part III: The Intelligence Failure
Before the first Dakota transport plane took off, the seeds of disaster were already sown.
The Dutch Underground had sent reports of German armor moving into the Arnhem area. Reconnaissance photos showed tanks hidden under trees near the drop zones. Major Brian Urquhart, the chief intelligence officer for the British I Airborne Corps, spotted these tanks in the photos and warned that two SS Panzer divisions—the 9th and 10th—were refitting in the exact area where the British 1st Airborne was scheduled to drop.
His warnings were dismissed. The Allied command, drunk on the successes of August, believed the German army was a broken force consisting of old men and children. Montgomery and Lieutenant General Frederick Browning famously brushed aside the concerns. Browning went so far as to place Urquhart on medical leave for "nervous exhaustion" to silence his dissent.
In reality, Field Marshal Walter Model, "Hitler’s Fireman," was in the area, and the II SS Panzer Corps was indeed resting in Arnhem. The British paratroopers, armed with light weapons, were about to jump directly on top of heavy German armor.
Furthermore, the drop zones selected for the British at Arnhem were nearly eight miles from the bridge. This decision was made to avoid anti-aircraft fire, but it meant the element of surprise would be lost long before the troops could reach their objective.
Part IV: Sunday, September 17 – The Drop
On a bright Sunday afternoon, the sky over the Netherlands turned dark with planes. It was a magnificent spectacle. Thousands of parachutes bloomed against the blue sky, and hundreds of gliders skidded across the Dutch fields.
Initially, the operation seemed to go well. The drops were accurate, and casualties were light. However, the friction of war began almost immediately.
In the South (101st Airborne):
The 101st secured most of their objectives but failed to capture the bridge at Son intact. The Germans blew it up just as the Americans approached. This was the first major setback; XXX Corps would have to bring up Bailey bridging equipment to cross, causing a delay of several crucial hours.
In the Middle (82nd Airborne):
General James Gavin’s 82nd Airborne secured the bridge at Grave and the lock bridges at Heumen. However, their primary objective, the massive Nijmegen bridge, remained in German hands. Gavin had been ordered to prioritize the high ground at Groesbeek Heights to protect the flank, delaying the assault on the bridge. By the time they moved toward it, SS troops had reinforced the city.
In the North (1st Airborne):
The British landed eight miles from Arnhem. As they began their march, the defects of the plan became apparent. Their radios—the Type 22 sets—failed completely. The dense forests and the urban environment blocked the signals, and the wrong crystals had been issued for some frequencies. The division was cut off from the outside world and, crucially, from its own units.
Furthermore, the presence of the SS Panzer divisions became a terrifying reality. As the British battalions marched toward Arnhem, they ran into a wall of German steel. Only the 2nd Battalion, led by the charismatic Lieutenant Colonel John Frost, managed to slip through the German perimeter. They reached the north end of the Arnhem road bridge, occupied the houses overlooking it, and prepared to hold.
They were supposed to hold for two days. They would end up fighting for their lives for four.
Part V: Hell’s Highway and the Nijmegen Crossing
By Monday, September 18, the weather had turned. Fog in England grounded the reinforcement lifts, meaning the troops on the ground were denied critical supplies and manpower.
On the ground, XXX Corps was fighting its way up the single road. The geography of the Netherlands worked against them. The road was raised above the surrounding polders (low-lying fields), meaning tanks could not maneuver off-road without bogging down. A single knocked-out vehicle could halt the entire column for hours. The Germans quickly realized this and launched constant attacks on the flanks of the column, severing the "Garden" supply line repeatedly.
By the time XXX Corps reached Nijmegen, the schedule was in tatters. The massive bridge over the Waal was still in German hands.
In one of the most heroic actions of the war, on September 20, Major Julian Cook of the 82nd Airborne led the 3rd Battalion, 504th Parachute Infantry Regiment, in a daylight river crossing. Using flimsy canvas boats, paddling with rifle butts under withering German machine-gun fire, the Americans crossed the Waal River. They suffered horrific casualties, earning the nickname "Little Omaha."
Miraculously, they reached the far bank, stormed the defenses, and captured the north end of the bridge. Simultaneously, XXX Corps tanks rushed the bridge from the south. The bridge was taken intact.
The road to Arnhem was finally open. But it was late. Too late.
Part VI: The Cauldron at Arnhem
While the Americans and XXX Corps fought in the south, the British 1st Airborne at Arnhem was being systematically destroyed.
Lieutenant Colonel John Frost and his men at the bridge were isolated. They were pounded by tanks, artillery, and infantry. The Germans methodically blew apart the houses the British were occupying. With no water, dwindling ammunition, and the cellars full of wounded, the "Red Devils" fought with a ferocity that earned the respect of their SS adversaries.
By Thursday, September 21, Frost’s force had ceased to exist as a fighting unit. They were overrun, dead, or captured. The bridge was lost.
The remainder of the division, led by Major General Roy Urquhart (who had been trapped in an attic for a day while hiding from patrols), retreated to a defensive pocket in the suburb of Oosterbeek, west of Arnhem. This area became known as "The Cauldron" or "The Hexenkessel" (Witches' Cauldron).
Compressed into a shrinking perimeter with their backs to the river, the British were subjected to constant mortar and artillery barrages. The medical stations, located in hotels and houses (most famously the home of Kate ter Horst, the "Angel of Arnhem"), became abattoirs.
The Polish 1st Independent Parachute Brigade, commanded by Major General Stanisław Sosabowski, dropped on September 21 on the south bank of the Rhine to support the British. Sosabowski had been skeptical of the plan from the start, and his men arrived into a chaotic situation. The ferry they were supposed to use to cross to Oosterbeek had been destroyed. They could do little but watch their comrades die across the river and try to ferry a handful of men across in rubber dinghies at night.
Part VII: The End of the Dream
By September 25, eight days after the initial drop, the situation was untenable. XXX Corps had halted just a few miles south of the river, unable to break through the final German defensive line and unable to move their heavy armor across the marshy terrain to support the Poles.
Montgomery gave the order to withdraw. Operation Berlin—the evacuation of the 1st Airborne—commenced.
Under the cover of darkness and heavy rain, the survivors of the 1st Airborne blackened their faces and wrapped their boots in rags to muffle the sound. They crept to the riverbank where Canadian and British engineers ferried them across in small boats.
It was a ghostly procession. Of the roughly 10,000 men of the British 1st Airborne Division who had landed at Arnhem, fewer than 2,200 escaped. The rest were dead or captured. The division was effectively wiped from the Allied order of battle and would never see combat as a unit again.
The Polish Brigade was also scapegoated unfairly by Montgomery and Browning for the failure, a smear on General Sosabowski’s reputation that took decades to correct.
Part VIII: Anatomy of a Failure
Why did Operation Market Garden fail? It was not a failure of the soldiers; the fighting spirit of the airborne troops and the tank crews was exemplary. The failure lay in the planning and the hubris of the command.
1. Underestimation of the Enemy:
The greatest sin of Market Garden was the dismissal of the German ability to recover. The Allies believed the Wehrmacht was defeated. They ignored hard intelligence regarding the SS Panzer divisions because it did not fit the narrative of a quick victory.
2. The Single Road:
Relying on one two-lane highway for an entire armored corps to advance 64 miles was a logistical impossibility. As soon as a truck was hit, the advance stopped. The Germans dubbed it the "Hell's Highway" for a reason.
3. Drop Zone Distance:
Dropping the British eight miles from their objective gave the Germans hours to react. Had the British utilized a coup de main glider landing directly at the bridge (like the Pegasus Bridge operation on D-Day), the outcome might have been different.
4. Communications:
The failure of the radios meant that commanders could not coordinate attacks or call for artillery support. It also meant that the RAF continued dropping supplies into zones that the Germans had already recaptured, essentially resupplying the enemy while the British starved.
5. Weather:
The delay in reinforcements due to fog in England allowed the Germans to consolidate their defenses and isolate the separate airborne pockets.
Part IX: The Aftermath and Legacy
In the immediate aftermath, Montgomery attempted to spin the operation as a partial success, claiming it was "90% successful." Prince Bernhard of the Netherlands famously replied, "My country can never again afford the luxury of another Montgomery success."
The consequences of the failure were severe. The hope of ending the war by Christmas 1944 vanished. The Allies faced a long, grueling winter. For the Dutch people in the north, the "Hunger Winter" of 1944-45 ensued. In retribution for a railway strike ordered to support the operation, the Germans cut off food supplies. nearly 20,000 Dutch civilians starved to death before liberation came in May 1945.
Arnhem remained in German hands until April 1945. The bridge itself was destroyed by the US Air Force to prevent the Germans from using it for counter-attacks.
Today, the operation is remembered with a mix of awe and sorrow. The phrase "A Bridge Too Far," coined by British General Browning before the battle (reportedly saying, "I think we may be going a bridge too far"), became the title of Cornelius Ryan’s definitive book and the subsequent film.
The battle serves as a stark lesson in the dangers of optimism bias in military planning. It highlights the tension between daring maneuver warfare and the rigid realities of logistics.
Yet, amidst the strategic blunders, the human story remains one of incredible endurance. The stand of Colonel Frost’s battalion at the bridge and the perimeter defense at Oosterbeek stand as testament to the sheer grit of the airborne soldier. They were asked to do the impossible, and they very nearly did it.
In the cemeteries at Oosterbeek and surrounding areas, thousands of white headstones stand in quiet formation. They are the final resting place of the men who jumped from the sky on a sunny September afternoon, believing they were jumping toward the end of the war, only to land in one of its darkest chapters.